MATLAB、Python、Scilab、Julia比較ページはこちら
https://www.simulationroom999.com/blog/comparison-of-matlab-python-scilab/
はじめに
の、
MATLAB,Python,Scilab,Julia比較 第3章 その102【射影変換⑯】
を書き直したもの。
アフィン変換の拡張と言われている射影変換の話。
実際にプログラムを組んでみる。
今回はJuliaで実施。
【再掲】射影変換の処理の流れ
まずは処理の流れを再掲。
- 画像の読み込み
- 変換元座標の確定
- 変換先座標の確定
- \(a~h\)の算出
- 射影変換行列の確定
- 射影変換
- 画像保存
これをJuliaで実現する。
Juliaコード
Juliaコードは以下になる。
using Images

function meshgrid(xin,yin)
    nx=length(xin)
    ny=length(yin)
    xout=zeros(ny,nx)
    yout=zeros(ny,nx)
    for jx=1:nx
        for ix=1:ny
            xout[ix,jx]=xin[jx]
            yout[ix,jx]=yin[ix]
        end
    end
    return (x=xout, y=yout)
end

# 射影変換変換関数
function homography(img, matrix)
    # 画像サイズ取得
    (hight, width) = size(img);

    # 中心を0とした座標系を生成
    x_axis = range(-1, 1, length=width);
    y_axis = range(-1, 1, length=hight);
    (xim,yim) = meshgrid(x_axis, y_axis);

    # 座標x,y,1の3次元ベクトルの配列
    # n(:)表記で列ベクトル化したあとに転置して行ベクトル化
    points = [xim[:]';yim[:]'; ones(1, width*hight)];

    # 変換元座標算出(射影逆変換)
    points_homography = matrix * points;

    # 画像と同一形状の2次元配列に変換元座標配列を生成
    dx = reshape(points_homography[1,:],hight,width);
    dy = reshape(points_homography[2,:],hight,width);
    ds = reshape(points_homography[3,:],hight,width);
    dx = dx./ds;
    dy = dy./ds;

    # 変換元座標をピクセル位置に変換
    v = UInt32.(round.(min.(max.((dx.+1)*width/2, 1), width )));
    h = UInt32.(round.(min.(max.((dy.+1)*hight/2, 1), hight )));

    # 元画像と変換元座標を元に変換先へコピー
    homography_img = img[h+(v.-1)*hight];

    return homography_img
end

# キャンパス拡張
function canvas_expansion(img, x, y)
    (H, W) = size(img);
    WID = W+x;
    HID = H+y;
    e_img = zeros(HID, WID);
    e_img[Int32((HID-H)/2)+1:Int32((HID+H)/2), Int32((WID-W)/2)+1:Int32((WID+W)/2)] = img;
    img = e_img;

    return img
end

function homography_toTrapezoid_test()
    # 入力画像の読み込み
    img = channelview(load("dog.jpg"));

    r = img[1,:,:];
    g = img[2,:,:];
    b = img[3,:,:];

    # SDTVグレースケール
    img = 0.2990 * r + 0.5870 * g + 0.1140 * b;

    # キャンパス拡張
    img = canvas_expansion(img, 100, 100);

    x0=-1; y0=-1;   # 左上
    x1=-1; y1= 1;   # 左下
    x2= 1; y2= 1;   # 右下
    x3= 1; y3=-1;   # 右上

    x0t=-0.5; y0t=-0.8;	# 左上変換先
    x1t=-0.8; y1t= 0.8;	# 左下変換先
    x2t= 1; y2t= 1;	# 右下変換先
    x3t= 0.4; y3t=-1;	# 右上変換先

    mat = [x0 y0 1  0  0 0 -x0*x0t -y0*x0t;
            0  0 0 x0 y0 1 -x0*y0t -y0*y0t;
           x1 y1 1  0  0 0 -x1*x1t -y1*x1t;
            0  0 0 x1 y1 1 -x1*y1t -y1*y1t;
           x2 y2 1  0  0 0 -x2*x2t -y2*x2t;
            0  0 0 x2 y2 1 -x2*y2t -y2*y2t;
           x3 y3 1  0  0 0 -x3*x3t -y3*x3t;
            0  0 0 x3 y3 1 -x3*y3t -y3*y3t];
    dst = [x0t y0t x1t y1t x2t y2t x3t y3t]';
    res = inv(mat)*dst;

    homo_matrix = inv([ res[1] res[2] res[3];
                        res[4] res[5] res[6];
                        res[7] res[8] 1]);

    homography_img = homography(img, homo_matrix);

    save("dog_homography_toTrapezoid_j.jpg",colorview(Gray, min.(abs.(homography_img),1)));
end

homography_toTrapezoid_test();
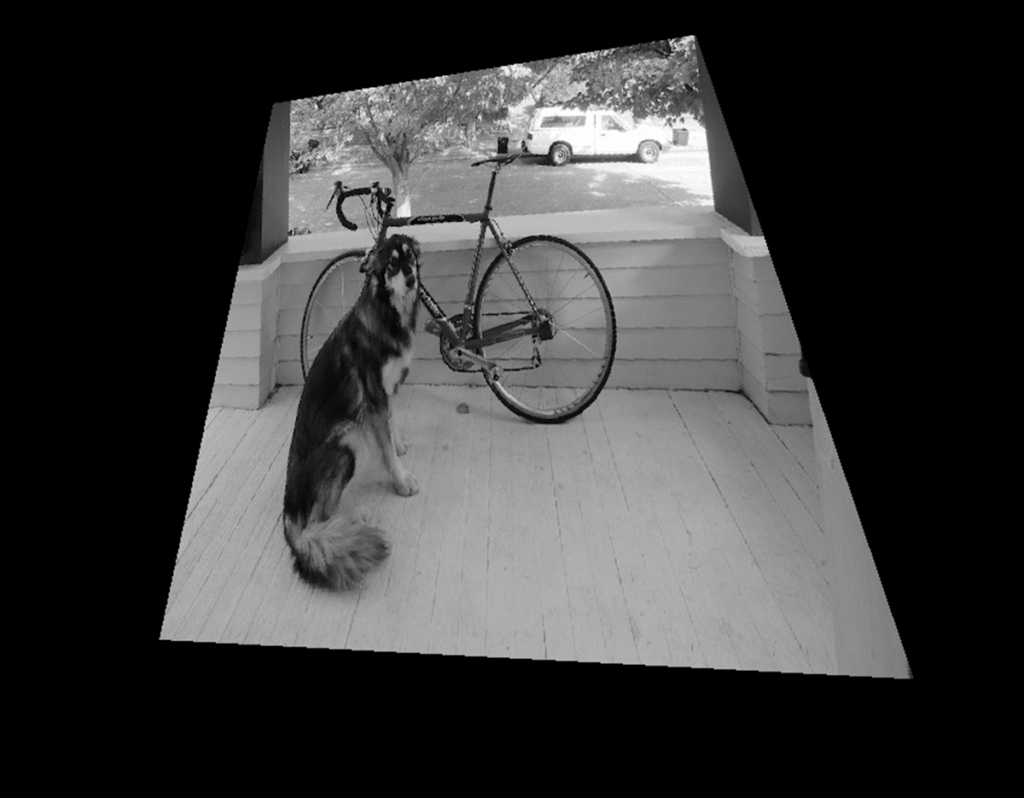
処理結果
処理結果は以下。

考察
これもMATLABと一緒。
射影変換の\(s\)の解決のさせ方も一緒。
ds = reshape(points_homography[3,:],hight,width);
dx = dx./ds;
dy = dy./ds;
アフィン変換をベースにすると、各ツール、各言語にて、
特質するような差は出ない。
まとめ
- Juliaで射影変換実施。
- 基本的にはMATLABと一緒で、射影変換のsを解決するコードを追加すればOK。
MATLAB、Python、Scilab、Julia比較ページはこちら


コメント