MATLAB、Python、Scilab、Julia比較ページはこちら
https://www.simulationroom999.com/blog/comparison-of-matlab-python-scilab/
はじめに
の、
MATLAB,Python,Scilab,Julia比較 第3章 その84【アフィン行列の合成⑧】
を書き直したもの。
アフィン変換のアフィン行列の合成の話。
今回はPython(NumPy)で実施する。
【再掲】プログラムで実現したいアフィン行列の合成
まずは、実現したいアフィン行列の合成。
\(
\begin{eqnarray}
\begin{bmatrix}
x\prime\\
y\prime\\
1
\end{bmatrix}=
\begin{bmatrix}
1 & m_x & 0 \\
m_y & 1 & 0 \\
0 & 0 & 1
\end{bmatrix}
\begin{bmatrix}
\cos(30^\circ) & -\sin(30^\circ) & 0 \\
\sin(30^\circ) & \cos(30^\circ) & 0 \\
0 & 0 & 1
\end{bmatrix} \\
\begin{bmatrix}
1 & 0 & T_x \\
0 & 1 & T_y \\
0 & 0 & 1
\end{bmatrix}
\begin{bmatrix}
S_x & 0 & 0 \\
0 & S_y & 0 \\
0 & 0 & 1
\end{bmatrix}
\begin{bmatrix}
x\\
y\\
1
\end{bmatrix}
\end{eqnarray}
\)
そして、アフィン逆変換のアルゴリズム都合で実際に使用する数式がこれ。
\(
\begin{eqnarray}
\begin{bmatrix}
x\\
y\\
1
\end{bmatrix}=
\begin{bmatrix}
S_x & 0 & 0 \\
0 & S_y & 0 \\
0 & 0 & 1
\end{bmatrix}^{-1}
\begin{bmatrix}
1 & 0 & T_x \\
0 & 1 & T_y \\
0 & 0 & 1
\end{bmatrix}^{-1}
\begin{bmatrix}
\cos(30^\circ) & -\sin(30^\circ) & 0 \\
\sin(30^\circ) & \cos(30^\circ) & 0 \\
0 & 0 & 1
\end{bmatrix}^{-1}\\
\begin{bmatrix}
1 & m_x & 0 \\
m_y & 1 & 0 \\
0 & 0 & 1
\end{bmatrix}^{-1}
\begin{bmatrix}
x\prime\\
y\prime\\
1
\end{bmatrix}
\end{eqnarray}
\)
これをPython(NumPy)で実現する。
Pythonコード
Pythonコードは以下になる。
import numpy as np
import cv2

# アフィン変換関数
def affine_transformation(img, matrix):
    # 画像サイズ取得
    hight, width = img.shape

    # 中心を0とした座標系を生成
    x_axis = np.linspace(-1, 1, width);
    y_axis = np.linspace(-1, 1, hight);
    xim,yim = np.meshgrid(x_axis, y_axis);

    # 座標x,y,1の3次元ベクトルの配列
    # reshapeで行ベクトル化、「*」で式展開
    points=np.array([[*xim.reshape(width*hight)],
                     [*yim.reshape(width*hight)],
                     [*np.ones((width*hight))]])

    # 変換元座標算出(アフィン逆変換)
    points_affine = matrix @ points;

    # 画像と同一形状の2次元配列に変換元座標配列を生成
    dx = points_affine[0,:].reshape(hight,width)
    dy = points_affine[1,:].reshape(hight,width)

    # 変換元座標をピクセル位置に変換
    v = np.clip((dx + 1) * width / 2, 0, width-1).astype('i')
    h = np.clip((dy + 1) * hight / 2, 0, hight-1).astype('i')

    # 元画像と変換元座標を元に変換先へコピー
    return img[h, v]

# キャンパス拡張
def canvas_expansion(img, x, y):
    H,W=img.shape
    WID=W+x
    HID=H+y
    e_img = np.zeros((HID, WID),dtype='uint8')
    e_img[int((HID-H)/2):int((HID+H)/2), int((WID-W)/2):int((WID+W)/2)] = img;
    img = e_img

    return img

def affine_transformation_test():
    # 入力画像の読み込み
    img = cv2.imread("dog.jpg")

    b = img[:,:,0]
    g = img[:,:,1]
    r = img[:,:,2]

    # SDTVグレースケール
    img = np.array(0.2990 * r + 0.5870 * g + 0.1140 * b, dtype='uint8')

    # キャンパス拡張
    img = canvas_expansion(img, 800, 800)

    sx = 1;
    sy = -1;
    tx = 0.5;
    ty = 0;
    theta = 150/180*np.pi;
    mx = np.tan(0/180*np.pi);
    my = np.tan(0/180*np.pi);

    scaling_matrix     = np.array([[   sx,      0,  0],
                                   [    0,     sy,  0],
                                   [    0,      0,  1]])
    scaling_matrix = np.linalg.inv(scaling_matrix)

    translation_matrix = np.array([[ 1, 0,  tx],
                                   [ 0, 1, -ty],
                                   [ 0, 0,   1]]);
    translation_matrix = np.linalg.inv(translation_matrix)

    rotation_matrix    = np.array([[ np.cos(theta), -np.sin(theta),  0],
                                   [ np.sin(theta),  np.cos(theta),  0],
                                   [             0,              0,  1]]);

    shear_matrix       = np.array([[  1, -mx,  0],
                                   [-my,   1,  0],
                                   [  0,   0,  1]]);
    shear_matrix = np.linalg.inv(shear_matrix)

    matrix = scaling_matrix@translation_matrix@rotation_matrix@shear_matrix;

    # アフィン変換
    affine_img = affine_transformation(img, matrix)

    # グレースケール画像表示
    cv2.imshow('image',affine_img)
    cv2.waitKey(0)

    # グレースケール画像の書き込み
    cv2.imwrite("dog_affine.jpg", affine_img)

    return;


affine_transformation_test()
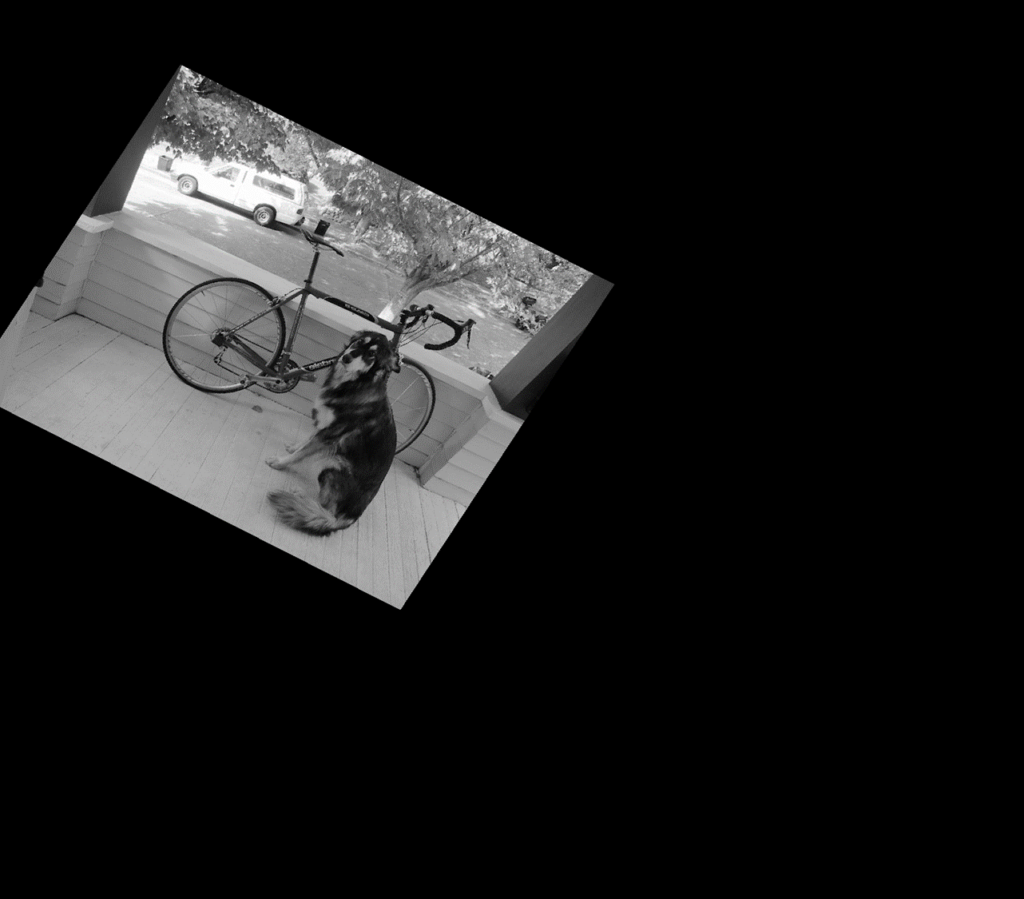
処理結果
処理結果は以下。

考察
これも動作はOK。
処理の手順としてはMATLABと一緒。
三角関数とかは様々なライブラリでもサポートしていることは多いが、
ここではNumPyが持ってる関数を使用している。
細かい精度の違いなどあるかもしれないが、そこは特に調べてない。
まとめ
- Python(NumPy)でアフィン行列の合成を実施。
- 問題無く動作。
- 三角関数ははNumPyが持っているものを使用。
- 他のライブラリも三角関数を持っていることが多い。
- 精度の違い等があるかもしれないが調べてない。
- 他のライブラリも三角関数を持っていることが多い。
MATLAB、Python、Scilab、Julia比較ページはこちら


コメント