
バックナンバーはこちら。
https://www.simulationroom999.com/blog/diagnostic-communication-backnumber/

はじめに
AUTOSAR-Dcmのシミュレーションの話。
登場人物
博識フクロウのフクさん

イラストACにて公開の「kino_k」さんのイラストを使用しています。
https://www.ac-illust.com/main/profile.php?id=iKciwKA9&area=1
エンジニア歴8年の太郎くん

イラストACにて公開の「しのみ」さんのイラストを使用しています。
https://www.ac-illust.com/main/profile.php?id=uCKphAW2&area=1
AUTOSAR-Dcm シミュレーション構成復習
さぁ今回からシミュレーションを始めるぞー。
おー!
じゃ、もう忘れていると思うので、構成を復習しておこう。
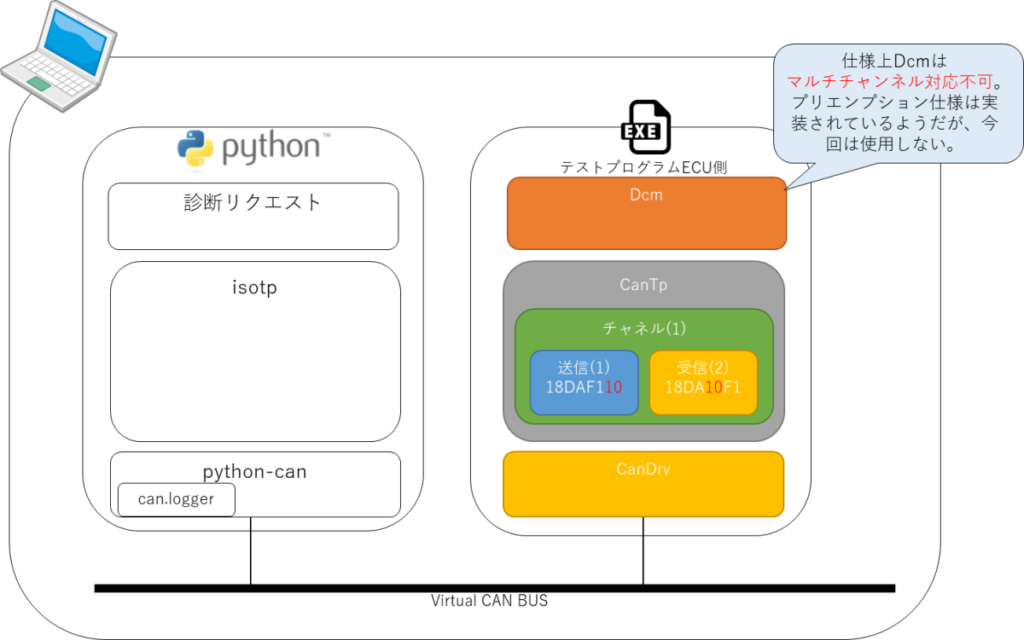
あー、こんなんだったねー。
AUTOSAR-Dcm シミュレーションで使用するPythonコード
そういえば、オフボードテスタ側のPythonコードはどうするの?
基本は、いままで作ったやつを使いまわすよ。
とりあえずは以下のタイプをベースにする。
import isotp
import logging
import time
import threading

from can.interfaces.vector import VectorBus

class ThreadedApp:
   def __init__(self):
      isotp_params = {
         'stmin' : 0,
         'blocksize' : 4,
         'wftmax' : 0,
         'll_data_length' : 8,
         'tx_padding' : 0xCC,
         'rx_flowcontrol_timeout' : 1000,
         'rx_consecutive_frame_timeout' : 1000,
         'squash_stmin_requirement' : False,
         'can_fd' : False,
         'tx_data_min_length' : 8
      }
      self.exit_requested = False
      #self.bus = VectorBus(channel='0', bitrate=500000)
      self.bus = VectorBus(channel='0', bitrate=500000, fd=True)
      addr = isotp.Address(isotp.AddressingMode.NormalFixed_29bits, source_address=0xF1, target_address=0x10)
      self.stack = isotp.CanStack(self.bus, address=addr, params=isotp_params, error_handler=self.my_error_handler)

   def start(self):
      self.exit_requested = False
      self.thread = threading.Thread(target = self.thread_task)
      self.thread.start()

   def stop(self):
      self.exit_requested = True
      if self.thread.isAlive():
         self.thread.join()

   def send(self, msg):
      self.stack.send(msg)

   def my_error_handler(self, error):
      logging.warning('IsoTp error happened : %s - %s' % (error.__class__.__name__, str(error)))

   def thread_task(self):
      while self.exit_requested == False:
         self.stack.process()                # Non-blocking
         #time.sleep(self.stack.sleep_time()) # Variable sleep time based on state machine state
         time.sleep(0.001) # Variable sleep time based on state machine state

   def shutdown(self):
      self.stop()
      self.bus.shutdown()

def sendrecv( app, msg ):
   print("Send msg : %s" % (msg.hex()))
   app.send(msg)
   t1 = time.time()
   while time.time() - t1 < 5:
      if app.stack.available():
         payload = app.stack.recv()
         print("Recv msg : %s" % (payload.hex()))
         break
      time.sleep(0.2)


if __name__ == '__main__':
   app = ThreadedApp()
   app.start()

   datas=[
      bytes([0x22, 0x01, 0x0a]),
      bytes([0x22, 0x01, 0x0a, 0x01, 0x0a, 0x01, 0x0a]),
      bytes([0x22, 0x01, 0x0a, 0x01, 0x0a, 0x01, 0x0a, 0x01, 0x0a, 0x01, 0x0a, 0x01, 0x0a, 0x01, 0x0a, 0x01, 0x0a]),
      bytes([0x22, 0x26, 0x10, 0x26, 0x10, 0x26, 0x10, 0x26, 0x10, 0x26, 0x10, 0x26, 0x10, 0x26, 0x10, 0x26, 0x10]),
   ]

   for i in range(len(datas)):
      sendrecv(app, datas[i])

   print("Exiting")
   app.shutdown()
あー、ここで使ったやつだね。

(今が74回目で、この時が38回目?
随分前だったんだな・・・。)
これだけだと、S3タイムアウトとかNRC$78の対応ができていないんだけど、
そこは必要になった段階で拡張していこう。
シミュレーションで試していく順番
どういう順番で試していくとか決めてるの?
まぁぶっちゃけどこからでも良いんだけど、
説明した順番かなー。
WriteDataByIdentifierあたりはセッション遷移とセキュリティありの設定にしているので、最後である必要はある。
SecurityAccessは前提としてDiagnosticSessionControlによるセッション遷移が必要。
TesterPresentはセッションやセキュリティアンロック維持の効能がある。
ReadDataByIdentifierとWriteDataByIdentifieはついになっている性質があるので、並んでいた方が良いだろう。
というわけで以下の順番にしよう。
- DiagnosticSessionControl
- SecurityAccess
- TesterPresent
- ReadDataByIdentifier
- WriteDataByIdentifier
(長々となんかよう分らんことを話してたけど、
まぁ順番が決まったなら良いか。)
まとめ
まとめだよ。
- AUTOSAR Dcmシミュレーション構成の復習
- オブボードテスタ側のPythonコードは今まで使ったやつを使いまわし
- 必要に応じて修正は入れる。
- シミュレーションを試す順番は以下。
- DiagnosticSessionControl。
- SecurityAccess。
- TesterPresent。
- ReadDataByIdentifier。
- WriteDataByIdentifier。
バックナンバーはこちら。


コメント