MATLAB、Python、Scilab、Julia比較ページはこちら
https://www.simulationroom999.com/blog/comparison-of-matlab-python-scilab/
はじめに
の、
MATLAB,Python,Scilab,Julia比較 第3章 その54【Hysteresis Threshold⑤】
非極大値抑制にHysteresis Thresholdを加えた、Canny法を実施して、2値化を行う。
今回はPython(NumPy)で実施する。
【再掲】Hysteresis Thresholdを実施するための手順
まずは手順を再掲。
- Sobelフィルタ等の微分フィルタで以下を推定
- x軸、y軸の濃淡変化量
- 変化強度(ノルム)
- 「x軸、y軸の濃淡変化量」から勾配方向角を推定
- arntan関数を利用
- 勾配方向を垂直(UD)、水平(LR)、斜め右上から右下(RULD)、斜め左上から右下の4パターンに丸め。
- 勾配方向角に応じて極大値評価をして非極大値だったら「変化強度(ノルム)」 を0値埋め
- Hysteresis Threshold
- High以上は白
- Low未満は黒
- High-Lowの間の場合は周辺を探査し、エッジが居れば白、いなければ黒
- 画像出力
今回は、これをPython(NumPy)で実現する。
Pythonコード
Pythonコードは以下になる。
import numpy as np
import cv2


# 畳み込み演算
def convolution2d(img, kernel):
    m, n = kernel.shape # カーネルサイズ取得

    # カーネル中心からみた幅
    dy = int((m-1)/2)  # カーネル上下幅
    dx = int((n-1)/2)  # カーネル左右幅

    h, w = img.shape   # イメージサイズ
    out = np.zeros((h, w)) # 出力用イメージ

    # 畳み込み
    for y in range(dy, h - dy):
        for x in range(dx, w - dx):
            out[y][x] = np.sum(img[y-dy:y+dy+1, x-dx:x+dx+1]*kernel)

    return out

# Non maximum Suppression
def non_maximum_suppression(G, theta):
    h, w = G.shape
    out = G.copy()

    # 勾配方向を4方向(LR,UD,RULD,LURD)に近似
    theta[np.where((theta >= -22.5) & (theta < 22.5))] = 0     # LR
    theta[np.where((theta >= 157.5) & (theta < 180))] = 0      # LR
    theta[np.where((theta >= -180) & (theta < -157.5))] = 0    # LR
    theta[np.where((theta >= 22.5) & (theta < 67.5))] = 45     # RULD
    theta[np.where((theta >= -157.5) & (theta < -112.5))] = 45 # RULD
    theta[np.where((theta >= 67.5) & (theta < 112.5))] = 90    # UD
    theta[np.where((theta >= -112.5) & (theta < -67.5))] = 90  # UD
    theta[np.where((theta >= 112.5) & (theta < 157.5))] = 135  # LUDRD
    theta[np.where((theta >= -67.5) & (theta < -22.5))] = 135  # LUDRD

    # 現画素の勾配方向に接する2つの画素値を比較し、現画素が極大値でなければ0にする。
    for y in range(1, h - 1):
        for x in range(1, w - 1):
            if theta[y][x] == 0:
                if (G[y][x] < G[y][x+1]) or (G[y][x] < G[y][x-1]):
                    out[y][x] = 0
            elif theta[y][x] == 45:
                if (G[y][x] < G[y-1][x+1]) or (G[y][x] < G[y+1][x-1]):
                    out[y][x] = 0
            elif theta[y][x] == 90:
                if (G[y][x] < G[y+1][x]) or (G[y][x] < G[y-1][x]):
                    out[y][x] = 0
            else:
                if (G[y][x] < G[y+1][x+1]) or (G[y][x] < G[y-1][x-1]):
                    out[y][x] = 0
    return out

# Hysteresis Threshold
def hysteresis_threshold(img, low, high, r):
    h, w = img.shape
    out = img.copy()

    for y in range(0+r, h-r):
        for x in range(0+r, w-r):
            # 最大閾値より大きければ「エッジ」
            if img[y][x] >= high:
                out[y][x] = 255
            # 最小閾値より小さければ「非エッジ」
            elif img[y][x] < low:
                out[y][x] = 0
            # 最小閾値と最大閾値の間で、半径rの範囲内に「エッジ」が1つでもあればエッジと判定
            else:
                if np.max(img[y-r:y+r+1, x-r:x+r+1]) >= high:
                    out[y][x] = 255
                else:
                    out[y][x] = 0

    return out

def canny_test():
    # 入力画像の読み込み
    img = cv2.imread("dog.jpg")
    b = img[:,:,0]
    g = img[:,:,1]
    r = img[:,:,2]

    # ガウシアンフィルタ用のkernel
    kernel_gauss = np.array([[1/16, 2/16, 1/16],
                             [2/16, 4/16, 2/16],
                             [1/16, 2/16, 1/16]])
    # Sobelフィルタ用のKernel
    kernel_sx = np.array([[-1,  0,  1],
                          [-2,  0,  2],
                          [-1,  0,  1]])
    kernel_sy = kernel_sx.T

    # SDTVグレースケール
    gray_sdtv = np.array(0.2990 * r + 0.5870 * g + 0.1140 * b, dtype='uint8')

    # ガウシアンフィルタ
    img_g = convolution2d(gray_sdtv, kernel_gauss)

    # Sobelフィルタ
    Gx = convolution2d(img_g, kernel_sx)
    Gy = convolution2d(img_g, kernel_sy)

    # 勾配強度と角度
    G = np.sqrt(Gx**2 + Gy**2)
    theta = np.arctan2(Gy, Gx) * 180 / np.pi

    # 極大値以外を除去(Non maximum Suppression)
    G_nms = non_maximum_suppression(G, theta)

    # Hysteresis Threshold(最小閾値除去、最大閾値以上を残し、且つそこと繋がっている最小閾値以上を残す)
    G_canny = hysteresis_threshold(G_nms, 30, 65, 1) # 0 or 255に2値化
    cv2.imwrite("dog_canny.jpg",G_canny)

    return;

canny_test()
処理結果
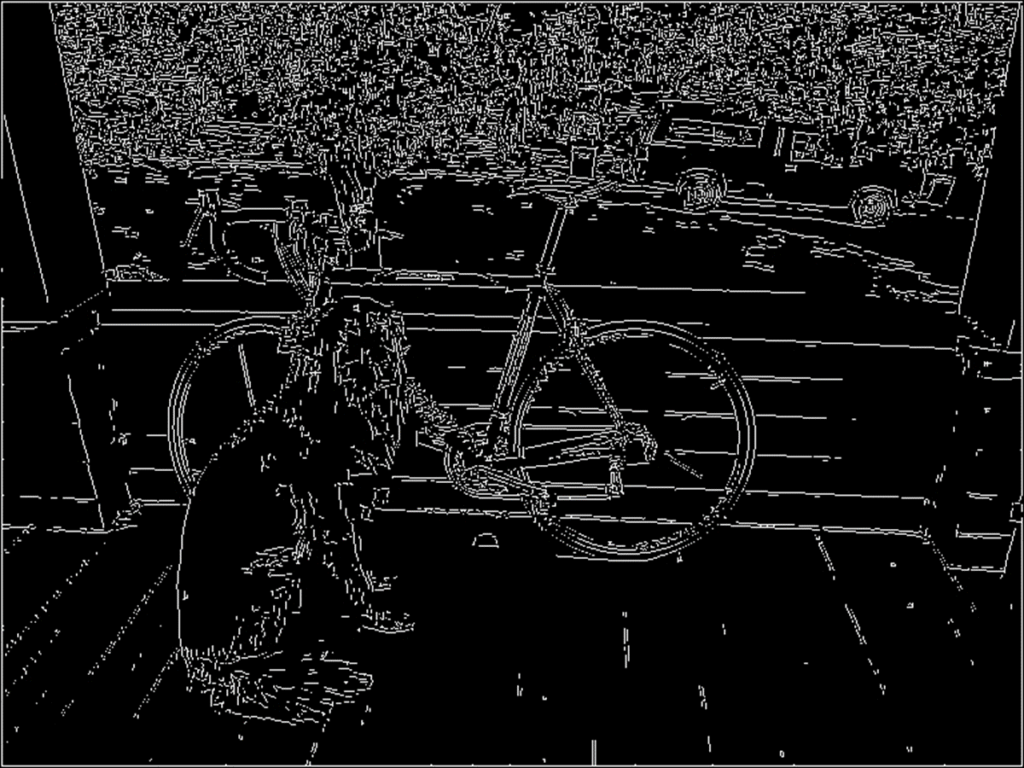
処理結果は以下。

考察
結果としては見た通りで、ちゃんと2値化ができている。
これもちゃんと2値化出来てる。
そしてソースコードを肥大はしたが、
これもhysteresis_thresholdとcanny_testが新規分になる。
毎度のことだが、
他と比べると0オリジンの都合でインデックスの指定がちょっとずれるのが悩ましいところではある。
まとめ
- 非極大値抑制にHysteresis Thresholdを加えた、Canny法による2値化をPython(NumPy)で実施。
- 基本的にはいままでのコードを再利用。
- 追加分はHysteresis Thresholdの部分。
MATLAB、Python、Scilab、Julia比較ページはこちら


コメント